Friday, 25 April 2014

small sighs

We have been so blessed with the weather over the holidays. I have taken advantage of the sunshine and spent as much time outside as possible. Afternoons spent eating hot cross buns was a highlight of the Easter weekend.

I have been loving:


Walks in the countryside

 Beautiful bunches of daffodils

 Swathes of bluebells

Bruschetta with pesto, mozzarella and basil

Have a lovely weekend friends. We have plans to finish decorating our office and sort through our road trip photos. Have fun.


Wednesday, 23 April 2014

honey caramel pears with goats cheese

These honey coated lovelies, with soft cheese and crisp rye wafers, make a simply mouth watering and delicious dessert for dinner parties, or an indulgent treat. Depending on the time of year, you could also use plump black or purple figs for a similarly decadent delight.

If you want to make them, be sure to check out the tips before you start

Ingredients (serves 2)
2 firm ripe pears
50g light brown sugar (you could use golden caster sugar)
30g runny honey
tiny pinch of salt
tspn white wine vinegar
30ml water

Method
  1. Cut a thin slice from the bottom of each pear so they can stand. Stick a fork into the bottom of each so you can hold it.
  2. Add the sugar, salt and water to a heavy based pan. Heat it gently, stirring with a wooden spoon, until all the sugar has dissolved. Then stir in the vinegar and honey.
  3. Stop stirring and turn the heat up to make the mixture bubble steadily. Heat until the mixture reaches 140 degrees Celcius on the sugar thermometer, stirring occasionally to prevent burning. 
  4. Working quickly, hold each pear by its fork and twist it in the caramel to coat it. Keep twisting in the air for a few seconds whilst the caramel hardens. 
  5. Carefully use another fork to ease each pear from its fork onto a piece of grease proof paper. Keep the pears upright, standing on their bare bases.
  6. Serve with soft goats cheese and crisp rye wafers (I made my own).
Tips
  • HOT CARAMEL BURNS. Keep a bowl of cold water very nearby, to immerse your hand if the caramel touches your skin.
  • If you don't have  a sugar thermometer, you can test it by pouring a little into a bowl of cold water. It should harden instantly and be brittle and easy to break. If you can still squash the toffee it needs further heating. (I didn't do this with the pear you can see and the caramel wasn't crisp).
  • The vinegar gives the caramel the structure it needs.
  • Serve within three to four hours.
Enjoy! Have a great day. 


Friday, 18 April 2014

how to decoupage a set of ikea drawers

As it's the holidays, I have finally got around to finishing this little set of drawers that I bought from Ikea many years ago. They were looking tired and past their best, so I had to find a way to make them look good enough to stay in my bedroom. I decided to use pictures from old Gil Elvgren desk top calendars.

It is my third decoupage project on the blog as I have also decoupaged a serving tray and a jewellery box.

You will need:
  • wooden drawers, or any other piece you want to decorate
  • pictures on paper
  • water-based primer
  • water-based matte varnish
  • polyurethane varnish
  • PVA glue
  • wooden knobs with screws
  • satin finish paint (for the insides)
  • paper towel
  • fine sandpaper (wet and dry is best)
  • soft cloth
  • paint brush
  • glue brush

What you do:
  1. Wash off any grease from the drawers.
  2. Lightly sand down all surfaces.
  3. Apply two coats of primer, lightly sanding after each coat.
  4. Use the satin finish paint to coat any surfaces you are not decoupaging.
  5. Plan each face by laying out the pictures. Cut each one out and glue it onto the wood, taking care that there are no air bubbles by pressing lightly with a damp lint free cloth. The pictures can, and should overlap to some extent. Let it dry.
  6. Brush on at least four coats (I used six) of water-based matte varnish, sanding lightly after each to remove bumps.
  7. After wiping to remove dust, finish with two coats of polyurethane varnish for extra toughness.
  8. Finish by giving the knobs a coat of primer, a couple of coats of paint and a couple of coats of oil-based varnish. Screw them onto the drawers from the back.

Tip: Give each picture a few moments to stretch after you apply glue. Then, as long as you avoid air bubbles, they will dry flat. Don't be worried by bubbles that seem to keep lifting, as they will flatten when the paper dries.


Have a great Easter weekend. I hope the Easter Bunny brings you lots of chocolate eggs. I'm hoping to make the most of this lovely sun. I'll see you on Wednesday.

Wednesday, 16 April 2014

how to make a hanging herb garden

What a lovely day it was today, so I just had to get out in the garden to start making it look pretty for the summer. This year, I am determined to grow more of my own herbs for cooking, as well as lots of rocket and other leaves for lovely fresh salads. 

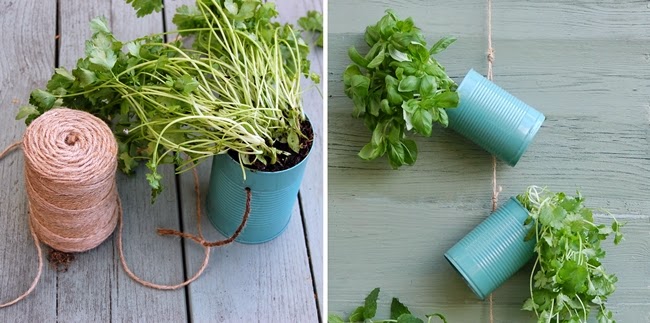
I want everything to look lovely without breaking the bank. I have been collecting cans with lots of projects in mind, and I knew I had a tin of paint in the shed. So, this afternoon I made this lovely little herb garden to hang on my shed. It was so quick and easy to make and this is how you can make one, too.

First peel the labels and remove the remains of any glue off the cans using nail varnish remover. Then make a hole for the string, about an inch from the top of each can. You can use a sharp nail and a hammer. Make four more holes in the bottom of each can for drainage.

Then rub all the shiny surfaces with sandpaper or wire wool, to provide a key for the paint. After wiping off any dust, spray the cans with two or three coats of paint, leaving a few minutes between each. I used a tin of multi-surface spray paint I have had in the shed for years. When the paint has dried, for each can, take a 10" piece of the string you are to use and knot it at one end. Thread the string through the hole in the can from the inside out.

At this stage you can fill each can with compost and plant herb seeds, leaving them on a windowsill to germinate or grow. Or you can do what I did and replant pots of herbs from a garden centre or nursery. I used mint, coriander and basil.

When the cans have herbs, tie each of them onto a longer piece of string, spacing them out as you wish. Then hang your herb garden somewhere sunny and give it a good watering.

A quick, easy and cheap shabby chic herb garden. Perfect for all size gardens or even a balcony.


Monday, 14 April 2014

small sighs


Saturday marked the official start date of the Easter holidays. So to celebrate I tucked into some lovely croissants, normally reserved for special occasions, and boy did I enjoy them! I normally eat breakfast in bed but as the sun was streaming through the blinds, I decided to get up and make the most of the day which included a lot of reading, drinking coffee and pottering.

Hopefully the weather will stay sunny so we can spend some much needed time in the garden. Lots of walks, enjoying the little things and maybe a spot of spring cleaning are my plans for this week.

I have been loving:

 Planting fresh herbs on the potting bench to use in recipes

Drinking jasmine tea in our favourite Vietnamese cafe

 Lovely scented lilies to brighten our dining room

Gorgeous gifts given to me by a dear friend 

Have a lovely week.


Friday, 11 April 2014

figs in honey with yoghurt - a perfect breakfast


I am loving the fruit and veg that is coming into the shops right now. Just in time for the warmer spring weather and for thoughts of fresh and varied food after all the comfort eating of the winter.

Not long ago, I discovered the delights of a Turkish owned continental supermarket, which is full to the rafters of the most unusual and varied produce from all parts of the world. I spend ages in there, just looking, fascinated by it all. And don't get me started on the pastry section!

Whilst I was there I bought some figs, which are a lovely reminder of holidays in Greece, where we picked them off the roadside bushes to have on yoghurt for breakfast. With that in mind, I thought I would try something a little different with them. I wanted to make a delicious breakfast to eat outside in the long awaited morning sun; a little taste of Greece.

I poured three or four tablespoons of honey in a small frying pan and heated it gently. I halved the unpeeled figs, placed them face down in the honey and cooked them for five minutes or so. Whilst they were cooking, I lightly toasted a handful of walnut pieces. To finish, I flipped the figs over for a minute or so, to cook the outsides.

All that was left was to fill a bowl with delicious Greek yoghurt, lay on the figs and drizzle over the honey from the pan, which by now looks and tastes divine. The walnuts, sprinkled on the top of all this lusciousness, add a lovely texture. Perfect for an alfresco breakfast!


Have a great weekend!

Wednesday, 9 April 2014

tempting tiramisu

Strawberry and white chocolate tiramisu makes a wonderful dessert for entertaining or for a romantic meal for two. The creamy white chocolate combines beautifully with the strawberries to taste delicious and look lovely, layered in the glasses. I made this when we went for dinner to a friend's house at the weekend and they loved it.

This is a lovely variation on the more traditional tiramisu I made for the romantic date night menu that you can see here.
Ingredients (Makes 6 to 8 glasses)
200g (7oz) caster sugar
400g (14oz) strawberries halved
50ml (2oz) creme de frambois or creme de cassis
200g (7oz) white chocolate
4 eggs separated
1 x 25og tub marscapone cheese
1 x 200g packet boudoir biscuits (sponge fingers)

  Method 
1) Put half the sugar in a saucepan together with 150ml (5fl.oz) of water. Bring to boil for 2 minutes then leave to cool for 5 minutes. Add creme de framboise and leave to cool completely.
2) Chop 150g (5oz) of the chocolate and melt in a small bowl over a pan of hot water. Remove and allow to cool a little.
3) Meanwhile beat the egg yolks with the remaining sugar until pale and thick. Beat in the marscapone cheese until really smooth, then stir in the cooled melted chocolate.
4) In a clean bowl, whisk the egg whites until they form stiff peaks. Fold them carefully into the egg and marscapone mixture until well combined.
5) Strain the fruit mixture over a bowl to catch the syrup. Dip half the biscuits in the cooled syrup and use them to line the bases of the glasses. Add a layer of the marscapone mixture followed by a layer of strawberries. Build up layers in this order and finish with a layer of marscapone mixture.
6) Grate the remaining white chocolate over the top of each glass. Cover the tiramisu desserts and chill in the fridge for 6 hours or overnight.

Have a lovely day.

From Rachel Allen - Home Cooking.


Monday, 7 April 2014

ten things i love about spring

It's finally time to put away winter coats and boots and breathe in the sweet Spring air. Spring always represents new beginnings and a fresh start. Longer, warmer days and being able to spend more time outside is for me a huge mood booster. The whole world seems to come alive with colour and beauty. In the words of Leo Tolstoy 'Spring is the time of plans and projects.'

Here are the ten things I love about Spring:

What are your favourite things about Spring? 

Have a lovely start to the week.


Friday, 4 April 2014

hi! i'm back with my april bucket list


It has gone so quick, but I am back from a two month blogging break. I've had some lovely messages asking where I have been and how I am, so thank you all for those kind thoughts. 

Life has been a bit tough recently, which has made it difficult to think about and enjoy creating blog posts. All my energies have been focused on getting by with the loss of the main wage in the house, and all the upset surrounding it. However, I know so many people have to cope with so much more, including some lovely friends. 

A few weeks ago, I restarted my photo-a-day project, which some of you will have seen on Facebook, Instagram and 365Project

I thought the best way to get positive again was to create a bucket list and make sure I do everything on it this time. The challenge now is to do it, enjoy it but not to break the bank (all money-saving tips greatly appreciated).

The Easter break from school is coming up and that is a chance to get some jobs done. This year I want to plant enough herbs and salad leaves to keep me going over the summer. There is no substitute for fresh loveliness. I also need to get busy with a paint brush. It's great having two wood burners keeping me warm all winter, but they don't do much for the cream decor. I would love to hear about your plans for this month.

I have missed you all and it feels good to be back. Thank you so much for sticking by me.

Have a lovely weekend.