Showing posts with label recipe. Show all posts

Monday, 25 January 2016

how to make a mojito mocktail

One of my favourite cocktails of all time has to be the delicious, fresh tasting mojito. As I'm taking part in Dry January, which is part of my monthly bucket list, I wanted to experiment with some different drinks so I didn't feel like I was missing out. I know mojitos are drunk in summer but hey, rules are meant to be broken.

I wasn't expecting to be blown away as it had no alcohol in it but boy was I wrong. It is rather tasty and, I have to admit, I've had more than one over the past week or so. Give it a try. You won't be disappointed and you won't wake up with a hangover! A refreshing change.

Ingredients
1 tbsp granulated sugar
small bunch mint
juice of 3 limes
crushed ice
soda water

Method
  1. Muddle the sugar and the mint leaves with a pestle and mortar.
  2. Put a handful of crushed ice into two glasses. 
  3. In a separate jug, mix the lime juice and mint mix together.
  4. Pour into the glasses, then top up with soda water.
Happy Days!

Have a great week lovelies.

Wednesday, 3 June 2015

make ice cream


Day 3 of my '90 days of summer' posts; make ice cream. Anyone that knows me knows how much I love ice cream. You can guarantee at the first sign of sunshine, I'm eating ice cream. It's the one thing I eat the most of at this time of year.

I fancied making my own but as I've never made ice cream before I wanted to find a recipe that looked easy and tasty. I found it! This Nigel Slater recipe is not just simple to do, it has to be the most flavoursome ice cream I've ever had. If you like marmalade and dark chocolate, you are going to love this.

Go on and give it a try; you won't be disappointed!

Have a great day lovelies

Monday, 1 June 2015

strawberry and blueberry smoothie

Day 1 of my '90 days of summer' posts; a delicious summer smoothie. It is a refreshing mix of milk, strawberries, blueberries and low-fat vanilla yogurt. A great way to start a summer's day!

It will be quite a challenge to post every day with something fun to do in summer, but it will certainly make sure I make the most of the better weather and longer days. 

Have a great day, lovelies.

Monday, 18 May 2015

baked feta salad with pitta crisps

This delicious dish always reminds me of hot, leisurely days on the beach in Greece. When I am in Greece, I have to indulge in a Greek salad at least once a day. It's perfect for lunch or a light bite and the added extra of pitta crisps finish it off nicely. 

Tasty, healthy and quick and easy to prepare. A delightful taste of summer.

Ingredients
200g feta cheese
1 tbsp fresh thyme leaves
1 red chilli  (deseeded and finely chopped)
1 clove garlic (finely sliced)
1 tbsp extra virgin olive oil

for the salad
1 green pepper (deseeded and sliced)
1/2 cucumber (halved and sliced)
160g baby plum tomatoes (halved)
1/2 red onion (sliced)
2 tbsp extra virgin olive oil
2 tbsp red wine vinegar
1/2 tsp dried oregano

for pitta crisps
3 white pittas (torn into pieces)
1 tbsp extra virgin olive oil

Method

  1. To make the crisps, put the torn pittas on a baking tray and drizzle with the oil. Bake in a preheated oven for 15 minutes at 200 C.
  2. Place feta in a small dish and scatter over the thyme, chilli and garlic. 
  3. Drizzle with the oil and bake for 10 minutes.
  4. Toss the salad ingredients in a bowl and top with the feta.
  5. Serve with the pitta crisps.
Have a great week lovelies.


Monday, 27 April 2015

fresh mackerel with roasted rhubarb


This combination of mackerel and rhubarb is absolutely delicious. Furthermore, it is so easy and quick to prepare. A perfect dish for brunch, lunch or an after work supper dish. This is a recipe we always make as soon as rhubarb is in season, as it never fails to hit the spot. 

Ingredients
for the roasted rhubarb
4-5 stalks rhubarb
1 tbsp light brown sugar

for the mackerel
2 fresh mackerel, filleted
1 tbsp seasoned plain flour
1 tbsp olive oil
3/4 sprigs of chopped rosemary
1 tbsp capers, drained
a splash of sherry vinegar

Method
  1. Cut the rhubarb into roughly 6in lengths and place in a roasting tin with half a teacup of water and the sugar. 
  2. Place in a preheated oven (200C/400F/Gas 6) and roast until it is soft enough to stab with a fork, about 10-15 minutes. Allow it to cool, drain and set aside the cooking juices.
  3. Dip the skin side of each mackerel fillet into the flour to coat. Place the mackerel fillet, skin side down, in a pan of heated oil. Scatter over the rosemary. Add the roasted rhubarb to the side of the pan to heat through, then add the capers.
  4. Turn the mackerel after two minutes and then cook for another minute or two. Add the sherry vinegar and allow it just to come to the boil. 
  5. Remove the mackerel and rhubarb and add a little of the reserved juices to the pan. Scrap round the pan with a wooden spoon to lift the crispy bits. Serve straightaway, with the sauce over the mackerel and the rhubarb on the side.
Believe me when I say you will love this dish. Perfect for Spring.

Have a fabulous day lovelies.


Wednesday, 24 September 2014

autumn fruit pudding & whisky double cream

A classic, warming pudding just right for Autumn evenings especially now that it's turning a little chillier. I used damsons from my trees in the garden and apples given to me by my neighbours but I'm sure other fruits would work well too.

Ingredients
2kg damsons or plums, pears and eating apples
a large knob of butter
100g brown sugar
1 vanilla pod
3 bay leaves
a pinch of ground ginger
a pinch of ground nutmeg
a pinch of ground cinnamon
1 x 300ml pot of double cream
1 tablespoon icing sugar
a shot of whisky

For the batter
200g butter, room temperature
200g golden caster sugar
4 large eggs
200g self-raising flour

Method
  1. Preheat the oven to 180C/350F/Gas Mark 4.
  2. Peel and core the apples, damsons/plums, apples and pears, then cut them into large pieces. Halve and stone the damsons, leaving the skin on. 
  3. Put into a large saucepan with the butter, sugar, spices and bay leaves. Stir it all together and stew for 20 to 30 minutes covered. When the fruit is soft, take out the bay leaves and place to one side.
  4. For the batter, cream the butter and sugar together until light and fluffy. Add the eggs, one at a time, mixing well, then fold in the flour. 
  5. Place half the fruit into the bottom of an ovenproof dish (without the juices) then top with the batter. Finally, spoon over the remaining fruit and bake for 40-45 minutes, or until golden brown and risen. 
  6. Using a knife, slice open the vanilla pod and scrape the seeds into a bowl. Pour in the cream and whisk together with the icing sugar until it forms soft peaks. Stir in the whisky.
Serve warm with lots of the cream and a little of the fruit juices. Delicious! Clean plates are guaranteed! Enjoy!

Monday, 7 July 2014

how to make iced coffee

One of my favourite things to do on holiday in Greece is to sunbathe on the beach and drink iced coffees, that the best bars make so well. Now that summer has arrived I wanted a little of the holiday feeling at home, but when I searched on Google for how to make iced coffees, there was little that inspired me. Should I use espresso, ground coffee or instant; milk, evaporated milk, condensed milk or cream? So, I made up my own recipes.

To make this iced latte, which is quite large, I added three teaspoons of high quality instant coffee and 3/4 of a mug of milk to a measuring jug. Then I added two dessert spoons of condensed milk and two teaspoons of vanilla flavoured syrup. You could use sugar instead of the syrup. Whichever you choose, the sugar is what helps to create the foam that is all part of the look. Then I used a hand blender, to mix and froth it all up, for about thirty seconds or so.

I then filled the jar with ice and slowly poured in the coffee to the top. Absolutely delicious! A perfect summer drink. Once you try it, you will be hooked!

For this iced coffee I used double strength cafetiere coffee which I then chilled. I wanted these to look pretty, so I put a heaped tablespoon of condensed milk on the bottom of the glass and then added ice to the top. Over this I poured the chilled coffee and served. Before drinking, you just give a quick stir with the spoon.

Which do I prefer, well I like them both. However, contrary to what you might think, the good instant coffee perhaps had the edge and probably makes better froth for a latte. It is also faster to make when you want to get in the sun as quick as possible.

What is your favourite iced coffee/latte?

Have a great week lovelies.


Thursday, 26 June 2014

ouefs en cocotte (eggs in pots)

This little dish is so modest that it barely needs a recipe. I made it as a starter last weekend, but it also makes a light, tasty supper. There are all manner of ways in which you can glam it up, but this is the humble eggs in pots.

Ingredients (serves 2)
about 80g creme fraiche
2 eggs
nutmeg
salt & pepper
to garnish
few leaves parsley
sweet chilli sauce

Method
  1. Preheat the oven to 180 degrees Celsius.
  2. Season the creme fraiche with salt and pepper and a pinch of nutmeg, and place a tablespoon full in the bottom of of a ramekin dish.
  3. Crack one egg on top and add another tablespoon of the creme fraiche. Sprinkle a little salt, pepper and nutmeg on top. Do this for both pots and place the pots in a dish of lukewarm water that comes halfway up the pots.
  4. Bake for about 15 minutes or until the eggs are cooked to your liking.
  5. Add a teaspoon of sweet chilli sauce to garnish and top with chopped parsley.
Perfect with crusty bread. Enjoy!

We are hoping for lovely weather on Saturday so we can go out and explore, and on Sunday we are off out for Sunday tea with friends. Have a great weekend lovelies. 

Wednesday, 4 June 2014

apple and bourbon cake

I just had to share this melt in the mouth cake recipe. As it is still cold enough for comfort food, I jumped at the chance of making this cake. My lovely Instagram friend Katerina, whose food shots make my mouth water, shared a picture of this cake she had made. She very kindly gave me the recipe to try and let me tell you, it's one of the best cakes I have ever made! Check out her lovely gallery here.

The bourbon works so well with the apples, pecans and spices. It is super moist, packed with fruit and has dark, spicy flavours.

Ingredients
225g/2 sticks unsalted butter,softened
220g/1 cup caster sugar
220g/1 cup dark brown soft sugar
3 eggs
280g/2 cups plain flour
1 tsp baking powder
1/2 tsp bicarbonate of baking soda
1 tsp ground allspice
1 1/2 tsps ground cinnamon
1 tsp freshly grated nutmeg
1/4 tsp ground cloves
1/4 tsp ground ginger
1/4 tsp ground cardamon
1/2 tsp salt
3 tablespoons Bourbon
3 Granny Smith apples, peeled, cored, and cut into chunks
120g/1 cup shelled whole pecans, toasted and roughly chopped

Deep, 20 cm/8 inch round cake pan,greased and baselined with parchment paper.
Serves 5-12

Method
  1. Preheat the oven to 160C/315F Gas 4.
  2. Using an electric mixer with paddle or beater attachment (or an electric whisk, which I used), beat the butter and both sugars until the mixture is almost light in colour and fluffy in texture.
  3. Add the eggs, one at a time, beating until thoroughly combined before adding the next. Scrape down the side of the bowl and mix again for one minute.
  4. In another bowl, combine the flour, baking powder, bicarb, all the spices and salt and sift twice.
  5. Add one third of the flour mixture to the egg mixture and mix until well incorporated. Repeat with another third of the flour mixture, then the rest of the flour mixture, and mix until just combined.
  6. Pour the Bourbon over the apples in a bowl and mix. Fold the apples and pecans into the cake mixture.
  7. Spoon the mixture into the prepared cake tin. 
  8. Bake in the preheated oven for 55-70 minutes. A wooden skewer inserted in the middle should come out with almost no crumbs attached, and the middle of the cake, when pressed, should spring back slightly instead of sink. Bake for an additional 5-10 minutes if necessary.
  9. Remove from the oven and let cool in the pan for 10 minutes. Slide a table knife all around the edge to loosen the cake, then remove from the pan. Transfer to a wire rack to cool for one hour.
Perfect with a cup of coffee, afternoon tea or as part of a picnic. This cake won't disappoint and definitely ticks all the right boxes! Well, it didn't last a full day here!

Enjoy!


Wednesday, 23 April 2014

honey caramel pears with goats cheese

These honey coated lovelies, with soft cheese and crisp rye wafers, make a simply mouth watering and delicious dessert for dinner parties, or an indulgent treat. Depending on the time of year, you could also use plump black or purple figs for a similarly decadent delight.

If you want to make them, be sure to check out the tips before you start

Ingredients (serves 2)
2 firm ripe pears
50g light brown sugar (you could use golden caster sugar)
30g runny honey
tiny pinch of salt
tspn white wine vinegar
30ml water

Method
  1. Cut a thin slice from the bottom of each pear so they can stand. Stick a fork into the bottom of each so you can hold it.
  2. Add the sugar, salt and water to a heavy based pan. Heat it gently, stirring with a wooden spoon, until all the sugar has dissolved. Then stir in the vinegar and honey.
  3. Stop stirring and turn the heat up to make the mixture bubble steadily. Heat until the mixture reaches 140 degrees Celcius on the sugar thermometer, stirring occasionally to prevent burning. 
  4. Working quickly, hold each pear by its fork and twist it in the caramel to coat it. Keep twisting in the air for a few seconds whilst the caramel hardens. 
  5. Carefully use another fork to ease each pear from its fork onto a piece of grease proof paper. Keep the pears upright, standing on their bare bases.
  6. Serve with soft goats cheese and crisp rye wafers (I made my own).
Tips
  • HOT CARAMEL BURNS. Keep a bowl of cold water very nearby, to immerse your hand if the caramel touches your skin.
  • If you don't have  a sugar thermometer, you can test it by pouring a little into a bowl of cold water. It should harden instantly and be brittle and easy to break. If you can still squash the toffee it needs further heating. (I didn't do this with the pear you can see and the caramel wasn't crisp).
  • The vinegar gives the caramel the structure it needs.
  • Serve within three to four hours.
Enjoy! Have a great day. 


Friday, 11 April 2014

figs in honey with yoghurt - a perfect breakfast


I am loving the fruit and veg that is coming into the shops right now. Just in time for the warmer spring weather and for thoughts of fresh and varied food after all the comfort eating of the winter.

Not long ago, I discovered the delights of a Turkish owned continental supermarket, which is full to the rafters of the most unusual and varied produce from all parts of the world. I spend ages in there, just looking, fascinated by it all. And don't get me started on the pastry section!

Whilst I was there I bought some figs, which are a lovely reminder of holidays in Greece, where we picked them off the roadside bushes to have on yoghurt for breakfast. With that in mind, I thought I would try something a little different with them. I wanted to make a delicious breakfast to eat outside in the long awaited morning sun; a little taste of Greece.

I poured three or four tablespoons of honey in a small frying pan and heated it gently. I halved the unpeeled figs, placed them face down in the honey and cooked them for five minutes or so. Whilst they were cooking, I lightly toasted a handful of walnut pieces. To finish, I flipped the figs over for a minute or so, to cook the outsides.

All that was left was to fill a bowl with delicious Greek yoghurt, lay on the figs and drizzle over the honey from the pan, which by now looks and tastes divine. The walnuts, sprinkled on the top of all this lusciousness, add a lovely texture. Perfect for an alfresco breakfast!


Have a great weekend!

Wednesday, 9 April 2014

tempting tiramisu

Strawberry and white chocolate tiramisu makes a wonderful dessert for entertaining or for a romantic meal for two. The creamy white chocolate combines beautifully with the strawberries to taste delicious and look lovely, layered in the glasses. I made this when we went for dinner to a friend's house at the weekend and they loved it.

This is a lovely variation on the more traditional tiramisu I made for the romantic date night menu that you can see here.
Ingredients (Makes 6 to 8 glasses)
200g (7oz) caster sugar
400g (14oz) strawberries halved
50ml (2oz) creme de frambois or creme de cassis
200g (7oz) white chocolate
4 eggs separated
1 x 25og tub marscapone cheese
1 x 200g packet boudoir biscuits (sponge fingers)

  Method 
1) Put half the sugar in a saucepan together with 150ml (5fl.oz) of water. Bring to boil for 2 minutes then leave to cool for 5 minutes. Add creme de framboise and leave to cool completely.
2) Chop 150g (5oz) of the chocolate and melt in a small bowl over a pan of hot water. Remove and allow to cool a little.
3) Meanwhile beat the egg yolks with the remaining sugar until pale and thick. Beat in the marscapone cheese until really smooth, then stir in the cooled melted chocolate.
4) In a clean bowl, whisk the egg whites until they form stiff peaks. Fold them carefully into the egg and marscapone mixture until well combined.
5) Strain the fruit mixture over a bowl to catch the syrup. Dip half the biscuits in the cooled syrup and use them to line the bases of the glasses. Add a layer of the marscapone mixture followed by a layer of strawberries. Build up layers in this order and finish with a layer of marscapone mixture.
6) Grate the remaining white chocolate over the top of each glass. Cover the tiramisu desserts and chill in the fridge for 6 hours or overnight.

Have a lovely day.

From Rachel Allen - Home Cooking.


Friday, 7 February 2014

polenta squares topped with mushroom and caramelised onion

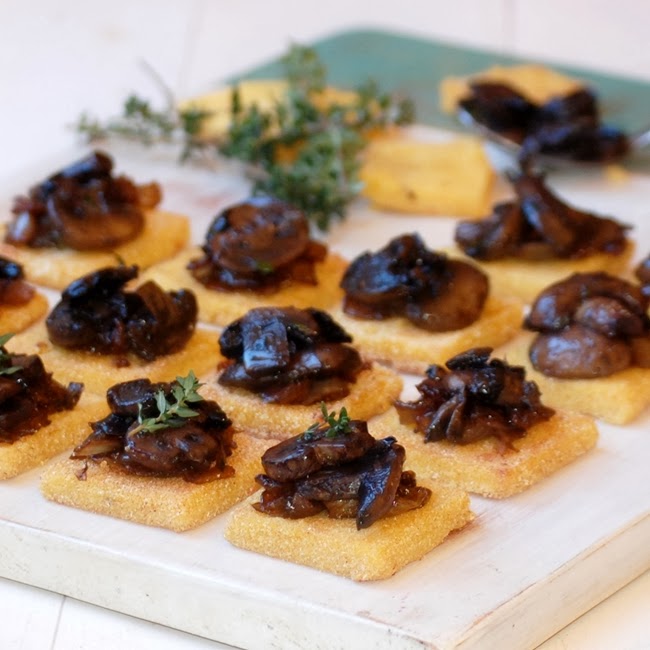
One of the 365 Project photo prompts this week was 'square' and so I decided that these yummy bite-sized snacks would be perfect. They were so delicious, I could hardly leave them alone long enough to take the picture you see here. For some reason I have never cooked with polenta, so I was delighted to find how easy it was. This delicious recipe can be found at deliciouseveryday.
As well as being delicious, these mushroom bites are great for using as a starter, as canapes or just a tasty TV snack. Another great thing about them is that you can do all the preparation the day before and just fry and assemble them to serve.

Method
1) Add the vegetable stock, along with with the butter, to a pan and bring to the boil. 
2) Reduce the heat and gradually whisk in the polenta. Keep whisking until it is thick and creamy. Remove from heat and whisk in the grated Parmesan.
3) Pour into a tray about 30cm by 20cm (12" x 8") and allow to set for about 20 minutes.
4) Meanwhile, add the onions to the olive oil in a saucepan. Let  them  soften, over a low heat, for about ten minutes. Add the balsamic vinegar and brown sugar and cook for a further ten minutes or so, until the onions are caramelised. Then set aside.
5) For the mushrooms, heat the olive oil in a frying pan and add the garlic. Cook for 2 minutes then add the mushrooms. Cook for 5 to 6 minutes.
6) Add the wine and thyme and then season with salt and pepper. Leave to simmer for about 10 minutes until the wine has all but evaporated. Set aside.
7) Heat 2 tablespoons of oil in a frying pan, until it is hot. Cut the polenta into bite-sized squares, coat them with uncooked polenta flour and fry them for 2 or 3 minutes on each side until golden brown. Leave to drain on kitchen towel.
8) Assemble the bites by spooning a little of the caramelised onion onto the squares and then top with the  mushrooms .

Note: It is worth frying a couple of the polenta squares for different times and testing by tasting, to see which texture suits you. Longer frying will produce more crunch in the polenta.

Enjoy!

Adapted from a recipe on www.deliciouseveryday.com

Have a lovely weekend, lovelies. We are going to wrap up and get out in the fresh air with a thermos of soup; weather permitting of course! 

Wednesday, 29 January 2014

super skinny pasta


Full of goodness, healthy and ready in twenty minutes! I make this yummy pasta dish on a regular basis as it is perfect for a quick midweek supper after work. The combination of spicy broccoli and salty anchovies gives it so much flavour!

Ingredients (serves 4)
250g linguine
50g tin anchovies
350g tenderstem broccoli, trimmed
500g cherry tomatoes, whole
4 cloves of garlic, sliced
1 red chilli
zest and juice of 1 lemon
2tbsp mini capers, to serve

Method
1. Cook the pasta in boiling water according to the pack instructions.
2. Drain 11/2 tbsp of oil from the anchovy tin into a pan and finely chop the anchovies. Gently fry with the garlic and chilli for 2 minutes until the garlic is golden. Add the broccoli and cherry tomatoes, along with 3tbsp water and cook for 5 minutes, until the broccoli is tender and some of the cherry tomatoes have burst.
3. Drain the pasta and stir through the lemon juice. Add the veg and capers, then top with a sprinkle of lemon zest and a grind of pepper.

Who thought low calorie could taste so good?


Wednesday, 22 January 2014

the best chocolate and beetroot brownies

When I first saw this recipe for chocolate and beetroot brownies, I wasn't too sure. Beetroot with chocolate didn't sound like a good combination to me! I am a lover of carrot cake though so for a change I thought I would try these out. There is nothing better than a brownie when it's cold for a bit of comfort.

Well I am so glad I did. The beetroot makes the brownies really moist and sweet and adds a lovely texture. It was hard not to have more than one piece at a time! Give it a go, you will be pleased with the result.

This yummy recipe is from the River Cottage website. Enjoy!


Friday, 27 December 2013

a homemade, healthy muesli

I woke up this morning feeling slightly worse for wear, having eaten far too much over the last couple of days! I needed to eat something a little lighter for breakfast so I tucked into this delicious muesli. I made it a couple of days ago and it is full of Christmas flavours. It's so easy and quick to make and it tastes yummy!

Ingredients
400g porridge oats
75g unsweetened dessicated coconut
100g skinned hazlenuts
100g skinned Brazil nuts, roughly chopped
100g soft light brown sugar
1 tsp ground cinnamon or mixed spice
1 tsp ginger
180ml water
120ml groundnut oil
1/2 tsp vanilla extract
1/2 tsp fine sea salt
75g pitted dates, roughly chopped
75g dried apricots, roughly chopped
75g dried cranberries
50g crystallised ginger, finely chopped 

1. Preheat the oven to 170C/Gas Mark 3. Mix together all the dry ingredients in a large bowl and stir well.
2. Whisk the water, oil, vanilla and salt together and then stir in the dry ingredients.
3. Spread the mixture out in two, large shallow roasting trays. Roast in the oven for 20-30 minutes, stirring and swapping the trays occasionally, until the muesli is golden and crisp, checking frequently towards the end. Leave to cool.
4. Stir in the dried fruit and crystallised ginger. Store in an airtight container.
Makes about 1.3kg

It makes such a lovely breakfast. I had mine with milk but I'm sure it will taste great with Greek yoghurt too. 

Enjoy! I hope you have all enjoyed a very Merry Christmas!

Recipe taken from 'Christmas with Gordon'.


Monday, 9 December 2013

a green tomato chutney for christmas

Home made chutney anyone! A friend of mine was kind enough to give me some green tomatoes to make some. This is my first attempt making chutney and I am so looking forward to eating this with a cheeseboard at Christmas. You can also add the chutney to a winter stew giving it a fruitiness. It is surprisingly easy to make and I am really pleased with the result.

Ingredients
175g/6oz light brown sugar
150ml/5 fl oz white wine vinegar
1 shallot, peeled and finely chopped
1 garlic clove, peeled and finely chopped
2cm/3/4in piece fresh root ginger, peeled and finely grated
1 red chilli, finely chopped
125g/4 1/2 oz sultanas
600g/1lb 5oz green tomatoes, quartered

1. Heat the sugar in a frying pan until it melts and caramelises.
2. Add the rest of the ingredients and bring the mixture to the boil. Reduce the heat and simmer for an hour, or until the chutney has thickened and you can draw a wooden spoon across the bottom of the pan so that it leaves a channel behind it that does not immediately fill with liquid.
3. Spoon the chutney into sterilised jars. I used a recipe by James Martin on Saturday Kitchen.

Have a lovely day

Wednesday, 13 November 2013

shepherds pie with spiced parsnip mash


It's coming to that time of year, when the weather is getting a little chilly and wet, that we start to crave a little comfort food. Shepherd's pie is great for a cold night and is very filling. I always make more than I need as it freezes so well.

I always feel cosy, warm and full after I have eaten a dish of this. Although, I can always make room for dessert!

This shepherd's pie topping has a very nice slightly spicy twist. If you fancy a change from the norm, give this a go.

Ingredients
-For the topping
900g/2lbs large parsnips, peeled and cut into large chunks
2 onions, slliced
large pinch ground cumin
1 tablespoon garam masala
1tablespoon freshly ground coriander seeds
50g/2oz butter
salt and freshly ground black peppper

-For the filling
2 leeks, chopped (can use onions)
1 carrot diced
3 tablespoons dripping or butter
4 brown mushrooms, sliced
450g/1lb lamb or beef mince
1 tablespoon flour
1 tablespoon tomato puree
250ml/9oz chicken stock
1 bay leaf
1 spring thyme
1 tablespoon Worcestershire sauce
Method

  1. Boil the parsnips in salted water for about 15 to 20 minutes or until tender.
  2. Meanwhile, fry the leeks in the butter until soft and translucent. Add the spices and stir for 2 minutes.
  3. Drain the parsnips and mash them together with the butter, salt and pepper. Put to one side.
  4. Cook the chopped leeks and the diced carrot with the butter until they are soft and golden.
  5. Add the sliced mushrooms, cook for five more minutes and then stir in the mince. let the mince cook and brown for five minutes, breaking it up as needed.
  6. Add the flour and the tomato puree and continue to cook, stirring frequently, for three to four minutes.
  7. Add the hot stock, the bay leaf and the thyme, and bring to the boil. Reduce the heat and leave to simmer slowly for 25 to 30 minutes.
  8. Meanwhile, preheat the oven to 190C/375F/gas mark 5.
  9. Season the filling with salt, Worcestershire sauce and plenty of black pepper.
  10. Put the mixture in a large baking dish and dollop the mashed parsnip on top. Bake for about 25  minutes until the top is golden brown.

This recipe can be found on Nigel Slater's A Taste of My Life.


Enjoy!

Friday, 8 November 2013

how to make a quick prawn balti curry


This is a perfect quick meal when you come in late from work, and it is healthy too!  I usually make this if I am feeling really tired as it doesn't require much effort! As it is ready in under 15 minutes, and the ingredients are mainly from the store cupboard, it is just so convenient. The spicy tomato sauce, together with the prawns, is just delicious.

Ingredients
desert spoon oil (rapeseed, ground nut or similar)
2 tablespoons medium or balti curry paste
1/2 medium onion, peeled and finely sliced
1 tablespoon mango chutney
4 ripe tomatoes, quartered
200g cooked prawns
100g spinach (fresh is best but frozen is okay)

  1. Pour the oil in a non-stick frying pan or wok on a low heat. Add the curry paste and onion. Turn up to a medium heat and cook for 3 minutes, stirring often, until the onions is softened.
  2. Add the tomatoes, chutney and 200ml of cold water. Once it is simmering, leave to bubble for 4 minutes. Stir occasionally until the tomatoes have softened, but still keeping their shape, and the liquid has reduced by half.
  3. Add the prawns and spinach. Stir fry for 2-3 minutes until the prawns are hot. Serve in warm bowls; wok-like balti bowls would be perfect.
Enjoy!

Have a lovely weekend and have lots of fun!


Saturday, 26 October 2013

how to make the best apple and blackberry pie


I felt like baking today and, as it was on my October bucket list, I decided to make this lovely seasonal apple and blackberry pie. It's a tasty way to use any blackberries you have picked and frozen this autumn. The apples, blackberries and ginger work so well together. I've never been particularly confident with pastry, but this is very easy to make.

Sweet shortcrust pastry
Ingredients
500g organic plain flour, plus some for dusting
100g icing sugar, sifted
250g cold butter, cubed
zest of a lemon
2 large eggs
splash of milk
  1. Sieve flour onto clean worktop then sieve icing sugar over that. Work the butter, with your hands, into the mixture until it is crumbly and fine.
  2. Add the eggs and milk into the mixture and work together until you can make a ball of dough.
  3. Flour the worktop and place the dough on top. Pat it into a flat round shape, lightly flour and wrap in cling film. Put in the fridge for 30 minutes.
Blackberry and apple pie
Ingredients
50g butter, plus some for greasing
100g golden caster sugar, plus some for dusting
2 Bramley cooking apples, peeled cored and cut into 16 wedges
4 Cox's apples, peeled cored and cut into 8 wedges
1 heaped tablespoon chopped stem ginger in syrup
150g blackberries
1 large organic egg, beaten
1/2 teaspoon ground cinnamon

  1. Preheat the oven to 180°C/350°F/gas mark 4.
  2. Put the sugar and butter into a pan. When the butter has melted, add the  apples, stem ginger and tablespoon of ginger syrup. Slowly cook for 15 minutes with lid on.
  3. Add blackberries and stir and cook for 5 minutes with lid off.
  4. Dust the worktop with flour. Cut the pastry in half and use a floured rolling pin to roll out one of the pieces, until it is just less than a centimetre thick.
  5. Butter a shallow 26cm pie dish and line it with the pastry. Trim of the excess with a sharp knife. Don't trim it too close as I did, as the pastry shrinks a little.
  6. Tip the cooled blackberries and apples into a sieve, saving the juices. Make a mound of the fruit in the middle of the pie dish and spoon over half of the reserved  juices. 
  7. Brush the edge of the pastry with beaten egg. Then roll out the second piece of pastry like the first and lay over the pie. Trim the edges and crimp with your fingers
  8. Brush the top of the pie with the rest of the beaten egg. Sprinkle generously with sugar and cinnamon. and make a couple of cuts in the top of the pastry.
  9. Place the pie on a baking tray and place on the bottom of the oven for 55 to 60 minutes until the crust is golden brown and crisp.
Serve your pie with lashings of rich, golden custard and enjoy.
This recipe can be found in 'Jamie at Home'.