

What a lovely day it was today, so I just had to get out in the garden to start making it look pretty for the summer. This year, I am determined to grow more of my own herbs for cooking, as well as lots of rocket and other leaves for lovely fresh salads.
I want everything to look lovely without breaking the bank. I have been collecting cans with lots of projects in mind, and I knew I had a tin of paint in the shed. So, this afternoon I made this lovely little herb garden to hang on my shed. It was so quick and easy to make and this is how you can make one, too.
First peel the labels and remove the remains of any glue off the cans using nail varnish remover. Then make a hole for the string, about an inch from the top of each can. You can use a sharp nail and a hammer. Make four more holes in the bottom of each can for drainage.

Then rub all the shiny surfaces with sandpaper or wire wool, to provide a key for the paint. After wiping off any dust, spray the cans with two or three coats of paint, leaving a few minutes between each. I used a tin of multi-surface spray paint I have had in the shed for years. When the paint has dried, for each can, take a 10" piece of the string you are to use and knot it at one end. Thread the string through the hole in the can from the inside out.

At this stage you can fill each can with compost and plant herb seeds, leaving them on a windowsill to germinate or grow. Or you can do what I did and replant pots of herbs from a garden centre or nursery. I used mint, coriander and basil.
When the cans have herbs, tie each of them onto a longer piece of string, spacing them out as you wish. Then hang your herb garden somewhere sunny and give it a good watering.
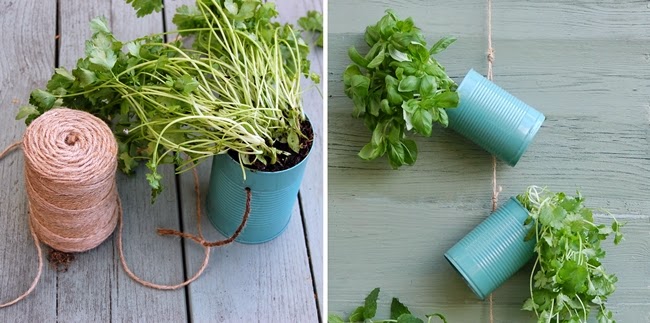
A quick, easy and cheap shabby chic herb garden. Perfect for all size gardens or even a balcony.

This is so cute, I want one now. So simple yet so effective xx
ReplyAwww thank you so much. I'm so glad you like it. It was so easy to make and didn't take me long at all. I'm already thinking about making another in a different colour xxx
That looks brilliant, love that paint colour too! What a clever idea :)
ReplyThank you so much Lisa. I was so pleased when I found this spray paint in the shed. It was the exact colour I was after. xxx
A great use of old cans, simple but very effect idea, thanks for sharing.
ReplyThanks Louise. I had good fun making it this afternoon. Hope you are enjoying the lovely weather xxx
These are beautiful Rachel. Good idea!
ReplyThank you so much Rachel. I'm so glad you like them xxx
Such a simple idea! I love the colour of the cans x
ReplyThank you Donna. This colour green is a favourite of mine. I have a lot of things painted in it! :-)
What a lovely idea. I have seen tins with patterns punched in them too which also looked pretty, as a change from painting them. xxx
ReplyThanks so much Curtise. I have seen the patterned tins too. They are on my list of projects to do. :-) xxx
They are so cute. What a great make over.
ReplyX x
Awww, thank you so much. It's a great recycling idea xxx
So simple, yet really beautiful xx
ReplyThank you so much Gailann. I'm so glad you like them :-) xxx
That's an awesome idea - I love recycling old tins for things! I really want to grow a herb garden when we have a house, especially has I make so many home made curries, would be great to have fresh rather than dried herbs all the time!
ReplyThank you so much Rachael. I'm so glad you like it. I'm determined this year to have lots of herbs on the go for cooking. I need to remember to keep watering them! Have a lovely weekend xxx